Customizing QToolTip by Jeremy Ernst

This is not a post about style-sheets. I wish it were that easy to add a background image to a QToolTip, but it's not.

I wanted to look into adding background images to tool-tips. The first thing I found was that you can use html as your tool-tip text to display an image in the tool-tip. But, I didn't want to just display and image. I wanted to display an image with text on top of it.

Here's how you can simply display an image as your tool-tip using HTML:

With this method, I would need to author tons of images just for tool-tips, which is crazy. I started digging into generating my own image using QPainter. While looking at the documentation, I found that QPainter had all sorts of handy functions to draw things, and this could all then be saved to a QPixMap. This worked really well! I supply an image to paint as the background, then draw text on top, then save that out as an image. I was pretty stoked when I got to this point. Here's the code for that:

My intention was to have 1 tool-tip image. It gets overwritten anytime a tool-tip is requested with the new image. However, when I would have widgets call on this method to generate their tool-tip image, it would only happen when that interface was instantiated, meaning the singular tool-tip would get stomped, and all widgets would end up with the same tool-tip.

The next idea was to give this method a unique filename to save out. But then I could end up with hundreds of tool-tip images, which isn't really much better than authoring my own. I really wanted the tool-tip image to be generated when a tool-tip was requested by a widget. To do this, I need to intercept the ToolTip QEvent. Okay, fine. How can I do this?

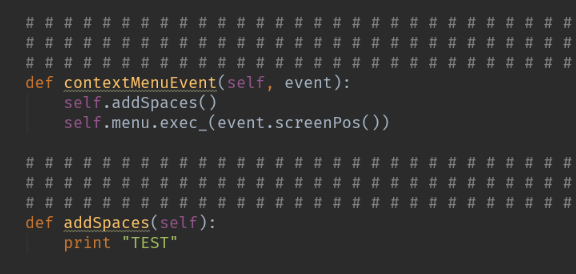
I created another function that is my own tool-tip event handler.

Now for the last steps. When creating a widget, I reassign the widget's event method to this method instead.

The tooltip_text property holds the text I want displayed on top of the image. The tooltip_size property, which is optional, determines which background image gets used. The first line, which is where this button's event method is reassigned, passes in itself as an argument so that I can query the above properties and set the tool-tip on that widget. This means there is only ever 1 tool-tip image, and it gets generated whenever a ToolTip event is intercepted (if that widget has reassigned its event method).

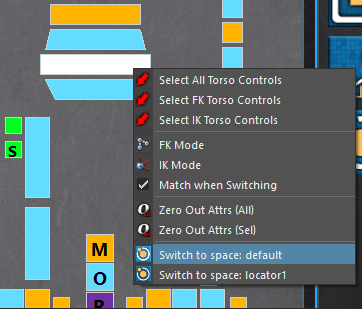
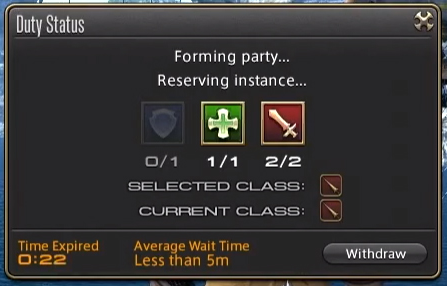
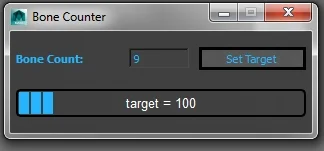
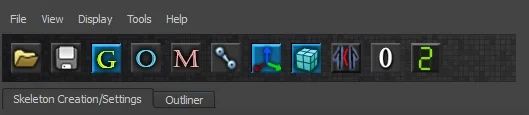
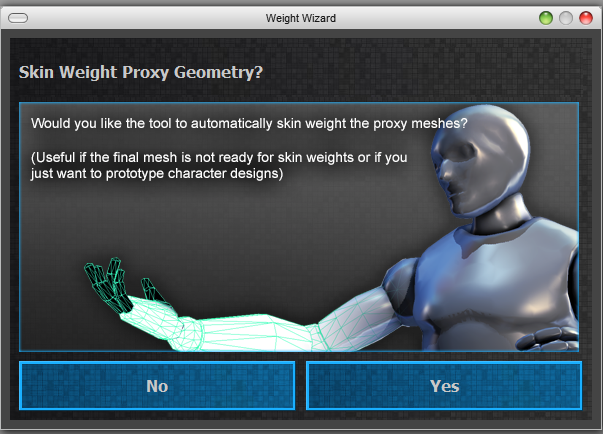
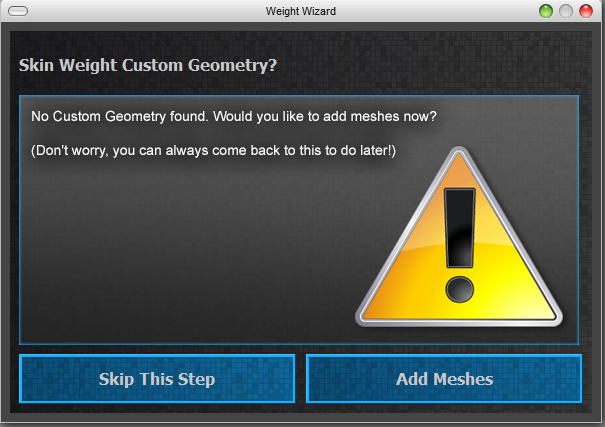
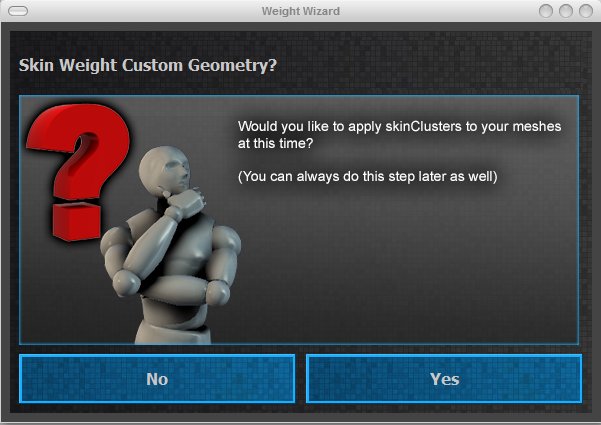
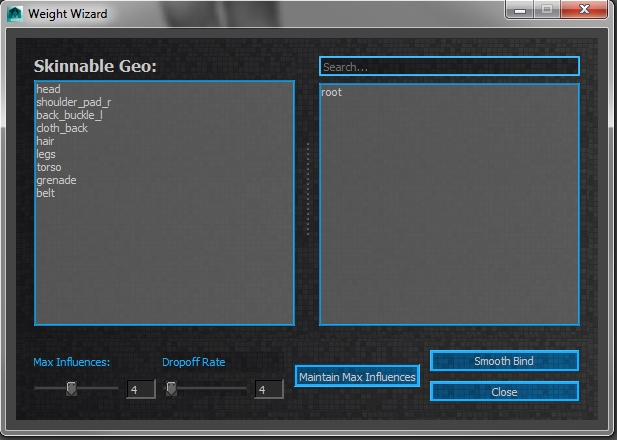
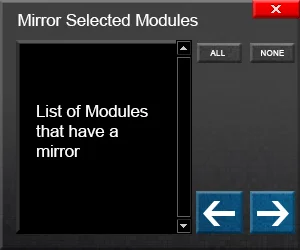
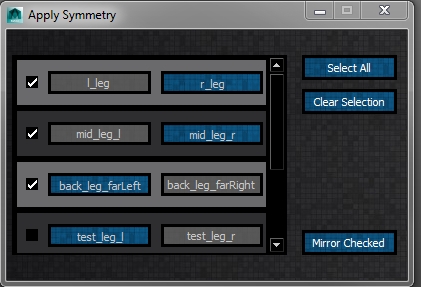
Below is what the end result looks like. Keep in mind it's the same image file being displayed on all of the buttons.

tooltips.gif

This was one of those things where I had the idea, and went down the rabbit hole until I figured it out. Is it super useful? Not really. But it adds an extra 5% of polish to my tool-tips I suppose!

ARTv2: New nested directory and existing directory support! by Jeremy Ernst

I've been wanting to do this for a while now and finally got around to it. In ARTv1, the tools could publish to a project directory, and that was it. In the initial implementation in ARTv2, you could publish to a project directory and one sub-directory of your creation. Now, you can create limitless sub directories under your project!

Furthermore, you can use an existing directory structure, like your source control directory, as the tool's project path. Then you can publish into that existing directory structure so you can keep your existing source assets and rigs all in the same place!

Also shown in the videos is the new UI styling. It's still a work in progress, but most of the rigging tools are re-styled.

Left: Old Style

Left: Old Style

Hover states

Hover states

As always, thanks to Epic and Riot for allowing me to share these tools with you all. Go support their games!

ARTv2: New Controls by Jeremy Ernst

I recently got some feedback from an animator that they found the new animation controls to be too busy. I can totally see that. I wanted to have controls that had some depth to them, but it really does add a bunch of clutter. The controls are taken from the joint mover curves below:

before_ctrls.PNG

So, if you had a character fully in FK, that's basically what you'd see (though the controls would be colored differently).

After working with him to find a scheme he liked, I've added a new feature that adds support for adding custom control shapes to the joint movers. These curve shapes hook up to the existing joint movers, and when the rig gets built, if connections exist, it will use those connections as the template for building rig controls. If not, it defaults to the joint mover curves.

So now, I can add a control shape to the joint mover file and get it where I want it. Then I parent it under the corresponding joint mover and select the joint mover and the new control and run the following to hook up the connection.

import maya.cmds as cmds

cmds.addAttr(cmds.ls(sl=True)[0], ln="fk_rig_control", at="message")
cmds.connectAttr(cmds.ls(sl=True)[1] + ".message", cmds.ls(sl=True)[0] + ".fk_rig_control")

cmds.addAttr(cmds.ls(sl=True)[0], ln="ik_rig_control", at="message")
cmds.connectAttr(cmds.ls(sl=True)[1] + ".message", cmds.ls(sl=True)[0] + ".ik_rig_control")

Which in turn, give me these attributes on the joint mover:

rig_controls.PNG

The end result looks like this now once the rig is built:

IK controls

IK controls

FK controls

FK controls

Definitely a cleaner look. This allows the controls to always be present as soon as you start adding modules, which means you can edit those control shapes and those edits will persist. No more making post-scripts to scale controls or manually doing it in the rig after build!

There is also a new tool in the rig creator interface for accessing these control shapes for editing:

edit_rig_ctrls.gif


Massive update on ARTv2 progress. by Jeremy Ernst

It's been a long time since an update, and a lot of changes have gone into ARTv2. These changes aren't out for grabs yet, but I wanted to show what progress has been made. Probably the biggest change that has been requested for a long time, is support for Y-up. ARTv2 now works in Y or Z up!

The first changes are on the rigging side, with a completed chain module, improvements to the arm module, and some other new features.

The next large batch of changes have been for animation. Lots of new tools! Take a look!

I'm still not entirely sure what the final platform will be for releasing these tools. Whether it will be github, or the UE4 marketplace, or something else entirely. I want to thank again, Epic Games, for allowing me to take these tools with when I left and also, Riot Games, for allowing me to continue to share the work I do on them with the community. 

The next feature I am working on right now is the pose library. I'll do some updates on that when I have more to show. I feel like once that feature is in, and it's been battle tested in a few different versions of Maya and on different operating systems, I could do an initial release. Hopefully, that means within 2 months time, these tools will be out and available for free.

Also, thanks to Ky Bui for providing the new proxy geometry and associated physique shapes! 


Python is awesome by Jeremy Ernst

I'm probably going to sound like an idiot, but I was working on something today, and found a solution that I was really excited about and thought I'd share. For experienced programmers, this is probably a big duh, but I was pretty stoked.

Okay, so the task I was working on was adding a control's spaces to the context menu in the control picker.

The task was pretty straightforward. When creating the menu initially, I check to see if a control has spaces, and if it does, add an action to the menu for each space. This worked well!

The original implementation in the torso's function that builds the picker. If the control was the body_anim, get its spaces, and add actions to the button class's menu.

The original implementation in the torso's function that builds the picker. If the control was the body_anim, get its spaces, and add actions to the button class's menu.

Here it is in action.

Here it is in action.

However, if I created a new space, it wouldn't show up in the menu unless I re-launched the UI. This is fine, but I wanted to see if I could generate the menu on the fly when the context event was called.

The picker button is its own class that creates its context menu. This class has the event for actually displaying the menu when you right click. I did a test and added a function to the button class that the contextMenuEvent would run first. That worked as expected.

The button class's function for launching the contextMenu and a test function to run before-hand.

The button class's function for launching the contextMenu and a test function to run before-hand.

Now, here is where I add items to the button class' menu in the torso class. The 'button.menu' refers to the button class instance and the menu of the button class. So it's just going through and adding the menu items. This is where I initially had it add the spaces, but because this function is only run when the animation picker class gets instantiated, it doesn't update.

Function in torso class that adds items to the button class's menu.

Function in torso class that adds items to the button class's menu.

I decided to try something, and to my amazement, it worked. Now, I don't have a ton of formal training in programming, so again, this might be stupid, but in the function that builds the picker for the torso where I was initially adding spaces, I take that button instance and reassign its addSpaces function to my torso's new addSpacesToMenu function.

Reassigning the button class's addSpaces function to the torso's addSpacesToMenu function

Reassigning the button class's addSpaces function to the torso's addSpacesToMenu function

The torso's addSpacesToMenu function that the button's addSpaces function now executes.

The torso's addSpacesToMenu function that the button's addSpaces function now executes.

Now, every time the context menu event is called, it runs the torso's addSpacesToMenu function before showing the menu, always ensuring any new information is added. I thought this was pretty neat!

Final implementation. Creating a new space now gets added to the context menu without relaunching the animation interface.

Final implementation. Creating a new space now gets added to the context menu without relaunching the animation interface.

Hopefully this is helpful to someone!

Happy New Year by Jeremy Ernst

No development updates, as I've been on vacation, but I wanted to write a post regardless. I'll warn you though, it's a bit long, and a bit of a ramble.

A couple of years ago, I got to this point in my career where I realized I knew very little when it comes to this field of rigging/tech art/tools development. I would see videos online of crazy rigs and crazy tools, and it was easy to just feel like I wasn't very good. And when I'd go to learn new things, I would realize just how much more there was to learn. I've seen the phrase: "the more I know, the less I understand", and I feel like that rings very true.

953384-Don-Henley-Quote-The-more-I-know-the-less-I-understand.jpg

I mean, sure, I know enough to be competent at my job, but when you look at the depth of knowledge in this career path, and all the things you could potentially learn, it's overwhelming. Rigging, deformation, anatomy, python, C++, API, math. It's like trying to climb a mountain that keeps growing as you climb it.

I don't know how I come off online, but I'm actually pretty insecure about my work. Me releasing tools to the public was not an act of confidence. I imagine there are incredibly talented people out there that have probably looked at the tools and thought that the code was sloppy, or it was amateur, or any number of things. And they're probably right. Each time I write something, it's a learning experience. The next thing I write is better, and then I want to go back and rewrite all the previous things, but that is a slippery slope that leads to nothing new getting done. 

Whenever I post something online, it isn't because I think it's the best thing ever, it's because I'm proud of it (at the time) and it's the best thing I've ever done. There was once a time I was proud of ARTv1! Ha! At the time though, it was an achievement for me. Now, it's embarrassing. All I can see is the lack of any coding standard, the sloppiness of the code, how disorganized it is, etc. But I wouldn't have learned anything if I hadn't tried to do it in the first place, and I think that's the important thing.

As I get older, the question of how to use my time becomes more important. I want to be the best at what I do, but that is an unreasonable goal. It's also hard to quantify and measure. Do I spend my free time constantly learning more and more, building and maintaining relationships, or working towards other goals? (or getting through Stormblood content in FFXIV)

I think it's good to know there is always more to learn, and that you will never be the best at all the things, and that's okay. There's a reason why MMORPG parties usually consist of a tank, healer, and some DPS. It creates a well-rounded, balanced team, as no one class is the best at all of those things. (can you tell I want to get back to playing some FFXIV?)

FF14Party.PNG

Unfortunately, real life isn't as clear and the lines in tech art aren't so nicely drawn. Most companies throw all sorts of types under the tech art umbrella, which can make it confusing on where to focus. 

I'm not very good at writing, and I don't have some tidy ending to this. So I'll end this by saying, don't bother comparing yourself to others. Congratulate their successes and use their work as inspiration or motivation. It's easier said than done, for certain. (This is more a note to myself than anything.) 

Oh, and Happy New Year :)

I'm still alive. by Jeremy Ernst

With the transition to Riot came moving across the county, selling a house, buying a house, and just a ton of other shit that life throws at you, I've been busy to say the least. I forgot how much moving sucks!

However, ARTv2 development is picking back up and lots of progress has been made in the last month or so. The chain module is currently in progress and some other new features have been added.

Hotkey Editor

The hotkey editor allows you to assign hotkeys to ARTv2 commands and functions.

The hotkey editor allows you to assign hotkeys to ARTv2 commands and functions.


Custom Pickwalking

Each module has pickwalking setup between controls within that module. However, pickwalking between different modules can be setup by the user using these tools.

Each module has pickwalking setup between controls within that module. However, pickwalking between different modules can be setup by the user using these tools.

pickwalkingDocs.gif

This stuff isn't on github yet, but I'll post an update once it is. Once I wrap the chain module and tidy up some documentation, I will do a big git update (before Christmas).


ARTv2 Now on Github! (and other news) by Jeremy Ernst

An alpha build of ARTv2 is now up on Github! This build is not fully feature complete, but if you're interested in testing the tools out and seeing what's there, or using it as a starting point to build from for your own pipeline, then go grab it! You'll have to have your github ID linked with Epic.

https://www.unrealengine.com/ue4-on-github

Once the tools are feature complete (for a minimal viable product), they will be released on the Unreal Engine Marketplace for free. That should happen later this year. In terms of reaching MVP, there isn't too much left. Below is what is needed before it will go onto the marketplace:

  • Chain Module

  • Pose Library Tool

  • Space Switcher Tool

  • Full Documentation


Now, for the other news. I am leaving Epic Games. At the beginning of the year, I definitely didn't think I'd be saying that, but I was offered a really great opportunity. In a couple months, I will be heading to Riot Games as a Principal Technical Artist. If you're concerned about ARTv2, don't be! Epic has been amazing with all of this and is letting me continue development of the tools. I was blown away by this gesture. So I will be continuing to work on them and then release them on the UE4 Marketplace for free when they are farther along. It's a win-win for everyone! I get to take the tools with me on my new adventure, Epic gets to still get updates on the tools, and the UE4 community will also be getting the tools!


ARTv2 Export Skeletal Meshes Tool by Jeremy Ernst

One of the things that ARTv1 does not have at all, is any type of tool to export skeletal meshes. On Paragon, our export process is fairly complex, as we have to manage multiple level of detail models (LODs), with bone removals, weight transfers, and LOD poses. So, for ARTv2, I wrote a tool that handles all of this. Originally, this was part of the publish process, but I broke it out into its own unique tool. 

With ARTv2, there is no longer an export file and an anim rig file, just the one rig file. Because of that, the export tool is now made to work with the rig itself. Once a rig is built, if you open or edit the rig file, and launch the rig creator tools, there is now the option to export skeletal meshes:

When you go to hit the button, it will prompt you to make sure the file is saved before continuing. What happens next is a temporary file is created that strips out the rigging, and sets the skeleton back to model pose. This temporary file is where you will be working when setting up your export data.

Once the temporary file is created, you are then presented with this UI:

The first thing you want to do, is choose which meshes are associated with this particular LOD. There is always a LOD 0, but additional LODs can be added or removed using the top right buttons.

Then you can choose the file path for the exported FBX.

If you do not need to remove any bones from LOD 0 (likely the case), then that is all you need to do here, and you could export at this time. However, to show the other features, I will add another LOD.

Now I can choose to remove bones, which presents me with another interface. In this interface, we can add entries for bone removal, which will also allow us to choose which bone to transfer the weighting to for all of the removed bones. There is logic here that prevents any mishaps or impossibilities, like assigning weight to a bone that is being removed, etc.

You can also handle LOD poses in this interface. Since we are removing all of the finger bones in this LOD, we may want to pose the fingers before doing so. (This prevents that paddle hands look when the model switches to the LOD in game).

This tool allows you to save that pose and will apply it when doing the export before transferring the weighting and removing the bones.

This file also has morph targets on the arms currently. The upper arm morph mesh exists in the scene while the lower arm morph mesh has been deleted. More on that later.

At this point, we are ready to export.

After the process is done, it reopens the rig file. All of those settings you set up for your export? Those get immediately transferred and set in your rig file as well, so the next time you export, all of the settings are already there.

Ok, so those morph targets. Because LOD 1 is removing bones and transferring weighting, it gets a bit difficult to deal with morphs, especially if the morph meshes don't exist. When the process gets to LOD1, it has to export the skin weights, pose the mesh with the LOD pose, delete mesh history, import the skin weights, transfer weighting, and remove bones. In that process, if a blendshape node exists on the mesh, it determines whether or not the morph mesh still exists. If not, it creates it by turning on the attr in the blendshape, and duplicating the render mesh. Once this is done for all meshes with morphs, it will reapply the blendshapes before importing the skin weights (after deleting the mesh history). 

So opening the LOD1 FBX, we see that bones have been removed, the LOD pose applied, the weighting transferred, and we see both morph targets in tact:

That about covers it!

June 2016 Update by Jeremy Ernst

A lot has happened here at Epic since the last post! We've shipped Paragon on early access, we had an amazing GDC showing, and we continue to ship a hero every three weeks. In between all of that, I've been working on the tools when possible.

GDC

McLaren Enterprise Demo

I had the privilege of working with our enterprise division on a demo showing a McLaren 570s in our engine. I rigged the car, which before I started the task, thought would be simple. Turned out, the model was from the CAD files, where every nut, bolt, and screw is modeled out. Needless to say, to took far more time to do than I had anticipated, but it was a lot of fun.

Here are a couple more tidbits from rigging the 570s that the trailer doesn't really show.

The interesting thing to note about this is that there is no skinning information here. It's all static pieces attached to joints, inheriting the joint transformations. Check out the live stream to learn more about that.

The interesting thing to note about this is that there is no skinning information here. It's all static pieces attached to joints, inheriting the joint transformations. Check out the live stream to learn more about that.

Hellblade Realtime Performance Demo

We partnered up with Ninja Theory, Cubic Motion, and 3lateral to do something unprecedented; driving a real-time character through live body motion capture and a live facial solver in UE4. 

 ARTv2

Since the last update, a lot of progress has been made. Both the arm and torso modules are now done, leaving only the head and chain left (which are probably the easiest of the bunch).

Quick demo of the arm rig. 

Quick demo of the arm rig. 

The auto clavicle has been re-written to use pose space, which achieves much more reliable results.

The auto clavicle has been re-written to use pose space, which achieves much more reliable results.

Quick demo of new finger rig features

Quick demo of new finger rig features

Quick demonstration of torso rig features.

Quick demonstration of torso rig features.

One of the things I spent some time on that I'm really happy with was how users install the tools and how they will get updates. The old installation method is messy at best, and prone to errors. Updates are a nightmare. Users need to wait on either new engine releases or know about the dropbox link that holds the latest scripts. It's a mess for everyone, including me.

So I spent a couple days and now have a super simple way of installing the tools. 

Now the issue of getting updates. I wanted to investigate the work in adding a feature directly to the tools that would search for updates, and automatically apply them. 

Lastly, and this last tool is more for me, I needed a reliable way to generate release notes and a zip archive of the tools that would coincide.

The next update, I should have the head and chain modules done. I'm also looking into writing a 'report a bug' feature that will utilize github's issue tracking system.

Digital Tutors Tutorial Released! by Jeremy Ernst

Character Skin-Weighting Techniques in Maya

Throughout these lessons, we will build a skeleton for our character model, learn about joint orientations and their impact on deformations, and skin-weight the entire character from beginning to end. We'll cover things to look for in the model that will cause issues with deformation down the road. We'll even go over editing the model to fix any errors that will inhibit us. Many skin-weighting techniques and tools are discussed and used throughout the course. You'll also learn how to transfer weights between meshes, how to mirror skinning on asymmetrical meshes, what to look for when skinning to ensure the best deformations, and we'll finish by creating a range of motion(ROM) animation and putting our character in a pose, which will test our skinning out. By the end of the course, you should have a firm grasp on the techniques needed and used to get great looking deformations on your characters.

January 2016 Update by Jeremy Ernst

Well, the last half of last year got pretty crazy and development on ARTv2 pretty much stopped. We announced Paragon, and released a teaser trailer for it. It was a ton of work, but I think we're all happy with the results.

However, since the start of the new year, my focus has been 100% on the tools, and progress is happening at a great pace. I plan on staying on top of the tools until they get to parity and are released :)

So, since the last update, a few things have been completed:

Match Over Frame Range Tool

Each module has settings in its class that determine if it has anything to match to, and what the match over frame range options are. I also figured out how to do animated buttons :)

The matching code is also vastly improved in accuracy and speed.

Single Joint Module

At the start of the year, I started writing the single joint module. Getting it into the UI as a module option took very little time. Then the joint mover had to be created, then the skeleton settings UI for the module:


Like the leg module, there are a few common elements in the settings interface. Change Name, Parent, Mirror Module, will always be there for every module. Everything below that is custom to that module. On the single joint, I wanted to be able to change the proxy geo mesh and the control type easily, so these are built into the settings:

The control gets used in the rig build process, so any modifications you make stay and get used as the rig control. 

Leaf joint and Jiggle joint from ARTv1 have been combined into this Single Joint module in v2. If you want jiggle dynamics, you can check the 'Has Dynamics' box, and the rig will be built with that as a mode. You can also choose here which attributes you want unlocked and animated, as well as add custom attributes!

For the custom attributes, I wanted to try and remove as much from post-scripts as possible, so now you can add attributes in the settings step, with their min/max/default values, and the goal will be to eventually be able to setup your relationships here as well. These custom attributes get saved with templates as well as get mirrored over when creating a mirror module.

Creating the mirror module was something I had to revisit in the base class as well. When working with just the leg module, I never tried having a leg a child of another leg, but with single joints, you'll likely be doing that sort of thing a lot! So, when creating a mirror, you want the mirror to be a child of the parent's mirror. So if I have a single joint as a child of thigh_l, when creating a mirror, I now look at the parent module of the single joint, see if that has a mirror, and if so, use that as the parent of the newly created module. 

The rig build is fairly straight forward, but if you have dynamics added, you get some more options, like mass, spring stiffness, damping, bounciness, and orient to parent.

The picker for the single joint was pretty easy to implement, given it's..a single joint. It creates the button, a label so you know what it is, and if you right-click, you can select it's settings.

The only thing left to do was write the single joint module's import FBX method, which was like 10 lines of code :)


Change Animation Picker Background

This was something else I added in. I really wanted the ability to set a custom background in the picker, in each picker tab. 

These backgrounds also save and load with the templates!


It's been a pretty productive couple weeks! There was also some bug fixes and polish items done. Next week I'll start the arm module, which I'm guessing will take a couple weeks, then I have the spine, head, and chain modules. So not too much left to get to parity! 

Animation Picker Complete, Import/Export Motion Complete! by Jeremy Ernst

Things are really starting to pick up! Progress is moving along nicely now.

The Animation Picker has been completed. Bugs have been fixed and functionality is all in place! At this point, the only thing that needs to be done is build each module's "picker" so that it can then be added to the canvas.


The next thing that was worked on was being able to export FBX motion out. The major improvements here, over V1, is that the speed of the export is insanely quick now. I made a lot of optimizations to improve the speed. The other thing added was the ability to also export the mesh from this tool. All settings made per character are also saved and remembered, so everytime the tool is reopened, the interface populates with those settings.

Lastly, I just wrapped up import motion today! This imports and FBX onto the rig (for things like mocap). Each module has its own settings on how it will import the data onto its controls. This means that only the controls needed for the given import method will get data. For the leg, I can choose None, FK, IK, or both. If I choose FK, only the FK controls will get data/keys. For the root, I can choose to import No motion, or I can import the root motion onto either the offset, master, or root control. The benefit of being able to choose None for each module, means that you can specify which modules will get motion, so you can combine mocap for upper/lower body, or whatever you'd want to do there.

Next up, I'll work on the matching tool, then onto the Single Joint module :)

Animation Picker WIP #1 by Jeremy Ernst

Loads done on the framework side of getting the animation picker up and running.

Each module has a picker that can be added to the canvas. That module's picker can then be moved, scaled, and rotated.

Saving and Loading templates is also working.

Next up: Ability to add more picker tabs (say a tab for fingers, face, etc), then biped leg picker

July Update! by Jeremy Ernst

It's been a long time since I did an update. Lots of stuff going on at Epic these days, and the days are packed with things to do, but tons of progress has been made on the tools amidst all that!

this is what I look like working..

this is what I look like working..

Since the last update, here are some of the things that have been done:

  1. Leg rigging completed

  2. Root rigging completed

  3. Global rig scale implemented (new V2 feature!)

  4. Rigging interfaces and code all wrapped up and polished

  5. Add and Edit Character UIs and functions done

  6. Animation picker R&D

  7. Began work on animation picker

For the rigging, most of the animator-facing features are the same, but under the hood, everything has been re-written and many small features added. As mentioned, there is now global rig scaling, which should be a pretty handy. Also, minor changes like: squash and stretch now correctly blend as do fk/ik switching.


For all of the rigging interfaces, I ripped out all of the custom images and styling I had been doing in code, and instead wrote a nice style sheet that each UI uses to cut down on the amount of code being written and also to give a nice consistent look to everything, as well as getting some additional polish features like button animation and such.

Add and Edit character use the same interface code, but the add/edit buttons get swapped out depending on which menu option you chose:


Also of note, is that there are no longer two files for every character. There is now only one file. If you want to edit a character, and you bring up the rigging tools, you will have to remove rigging to go back and edit placement and such.


The animation picker has been something I've been fearing a little bit, as it was the main thing I had in my head that I didn't really know how to pull off. I did some research and some tests and actually got what I thought would be the hardest part working in a day. This test shows what would eventually be a picker for a module, being able to be moved around on a canvas, rotated, and scaled. Each module will have a pre-written picker for it, that can be added to a canvas, and manipulated like this.


This will then get saved out to a picker file that will be associated with the given character. Even for the standard biped picker, this would allow people to go in and edit that file to better customize the layout for them. The rest of the picker isn't far enough along to bother showing until I get more done, but that will be the next big thing coming up.

Cheers!


A.R.T. update #5 by Jeremy Ernst

Whoops! It's been a while since I've posted an update. Lost track of time I suppose. I've been spending the majority of my time working on our game projects, which has been tons of fun! I sneaked in a few days of work on the tools though, so here's where things currently are!

  • I cleaned up the UI a little bit, removing the bone counter from being embedded to being a separate widget you can bring up:

  • I got the reset modules tool in and done! This tools lists all of the modules in the scene and allows you to multi select them, and either reset their settings or reset their transformations (with translate, rotate, and scale broken out)

  • Added the above tools to the toolbar (reset being the 0, and bone counter being the 2 icon):

  • I began work on the next phase of the pipeline, previously called deformation setup. It's now been changed to Finalize Setup, which I think is clearer.

  • Wrote a "Weight Wizard", that guides users through getting deformations setup on their characters. There was always some confusion over when and where in the process to add your custom meshes, so hopefully this will clear that up!

  • The last image shows a new tool that allows you to quickly get skinning information on your meshes quickly. It's still in progress, but all of the main functionality is there.

Lastly, here is a video showing and covering all of the above features in greater detail. Enjoy!


Mini Update: Mass Mirror Mode by Jeremy Ernst

I was able to get some time in the past couple of nights to get this feature in. This feature replaces symmetry mode in the current version of the toolkit. However, I wanted something a little bit easier to work with since this is a modular system, so I came up with a new tool for it.

First, I planned out what the interface might look like in photoshop:

This is just meant to give a quick direction to start working towards. Here was my initial replication of that design in Qt:

This image doesn't show all of the iteration up to this point. The first thing I had to figure out that I didn't put any thought into during the initial brainstorming was how to list the modules. This tool is supposed to show you the modules that can mirror and let you decided how to mirror them. At first, I had a list of all of the modules, but that doesn't allow you to choose how and what to mirror. So the image above represents the next step, which was making a list of pairs: the module and the mirror module, and allowing you to select the one that the tool would use the transformations of. However, there are a few issues here. The Left to Right and Right to Left buttons are no longer needed since you specify the mirroring behavior in the list. Also, the list needs to be wider to accommodate longer names.

Here is a look at the final version(though I'm not quite sold on the color scheme yet. That might change):

Here's a quick video showing the tool in action: