Digital Tutors Tutorial Released! by Jeremy Ernst

Character Skin-Weighting Techniques in Maya

Throughout these lessons, we will build a skeleton for our character model, learn about joint orientations and their impact on deformations, and skin-weight the entire character from beginning to end. We'll cover things to look for in the model that will cause issues with deformation down the road. We'll even go over editing the model to fix any errors that will inhibit us. Many skin-weighting techniques and tools are discussed and used throughout the course. You'll also learn how to transfer weights between meshes, how to mirror skinning on asymmetrical meshes, what to look for when skinning to ensure the best deformations, and we'll finish by creating a range of motion(ROM) animation and putting our character in a pose, which will test our skinning out. By the end of the course, you should have a firm grasp on the techniques needed and used to get great looking deformations on your characters.

January 2016 Update by Jeremy Ernst

Well, the last half of last year got pretty crazy and development on ARTv2 pretty much stopped. We announced Paragon, and released a teaser trailer for it. It was a ton of work, but I think we're all happy with the results.

However, since the start of the new year, my focus has been 100% on the tools, and progress is happening at a great pace. I plan on staying on top of the tools until they get to parity and are released :)

So, since the last update, a few things have been completed:

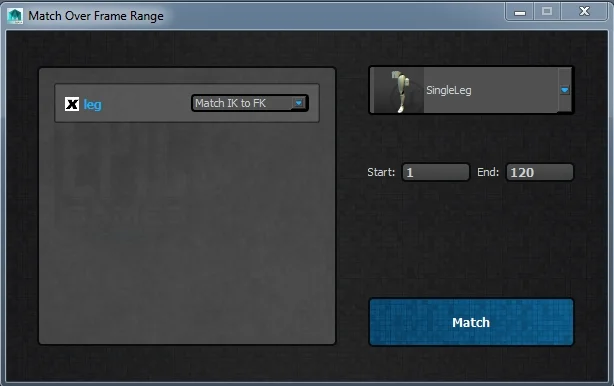
Match Over Frame Range Tool

Each module has settings in its class that determine if it has anything to match to, and what the match over frame range options are. I also figured out how to do animated buttons :)

The matching code is also vastly improved in accuracy and speed.

Single Joint Module

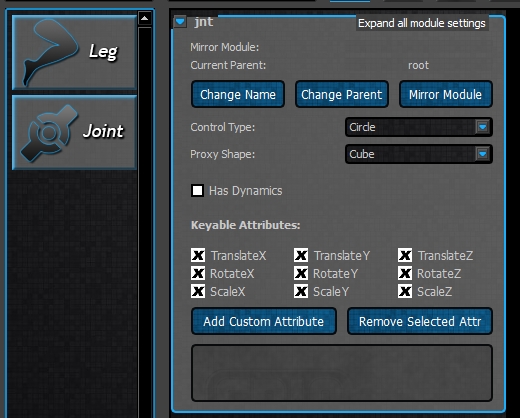
At the start of the year, I started writing the single joint module. Getting it into the UI as a module option took very little time. Then the joint mover had to be created, then the skeleton settings UI for the module:


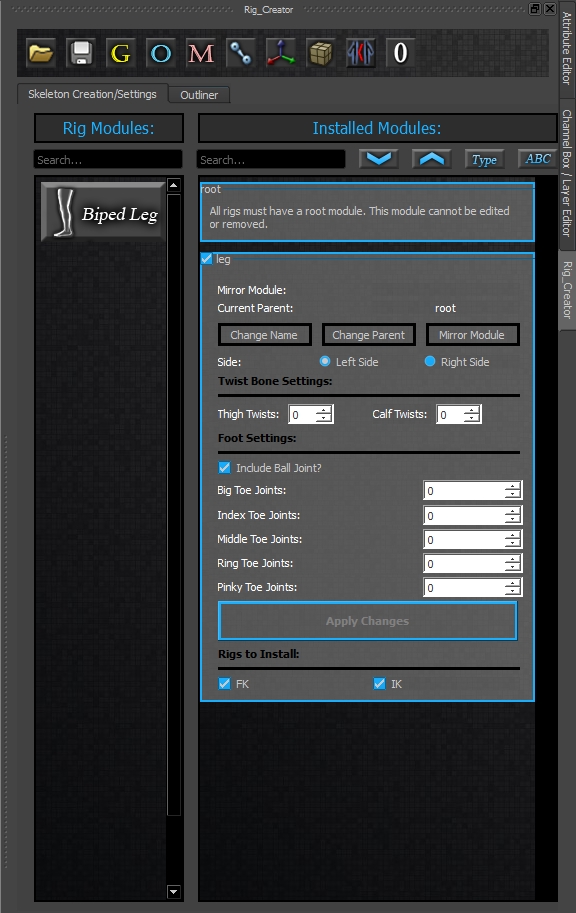
Like the leg module, there are a few common elements in the settings interface. Change Name, Parent, Mirror Module, will always be there for every module. Everything below that is custom to that module. On the single joint, I wanted to be able to change the proxy geo mesh and the control type easily, so these are built into the settings:

The control gets used in the rig build process, so any modifications you make stay and get used as the rig control. 

Leaf joint and Jiggle joint from ARTv1 have been combined into this Single Joint module in v2. If you want jiggle dynamics, you can check the 'Has Dynamics' box, and the rig will be built with that as a mode. You can also choose here which attributes you want unlocked and animated, as well as add custom attributes!

For the custom attributes, I wanted to try and remove as much from post-scripts as possible, so now you can add attributes in the settings step, with their min/max/default values, and the goal will be to eventually be able to setup your relationships here as well. These custom attributes get saved with templates as well as get mirrored over when creating a mirror module.

Creating the mirror module was something I had to revisit in the base class as well. When working with just the leg module, I never tried having a leg a child of another leg, but with single joints, you'll likely be doing that sort of thing a lot! So, when creating a mirror, you want the mirror to be a child of the parent's mirror. So if I have a single joint as a child of thigh_l, when creating a mirror, I now look at the parent module of the single joint, see if that has a mirror, and if so, use that as the parent of the newly created module. 

The rig build is fairly straight forward, but if you have dynamics added, you get some more options, like mass, spring stiffness, damping, bounciness, and orient to parent.

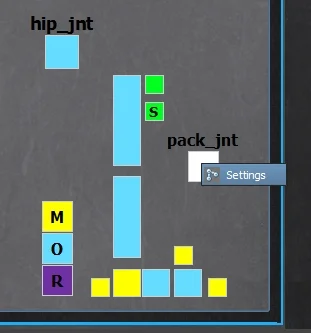
The picker for the single joint was pretty easy to implement, given it's..a single joint. It creates the button, a label so you know what it is, and if you right-click, you can select it's settings.

The only thing left to do was write the single joint module's import FBX method, which was like 10 lines of code :)


Change Animation Picker Background

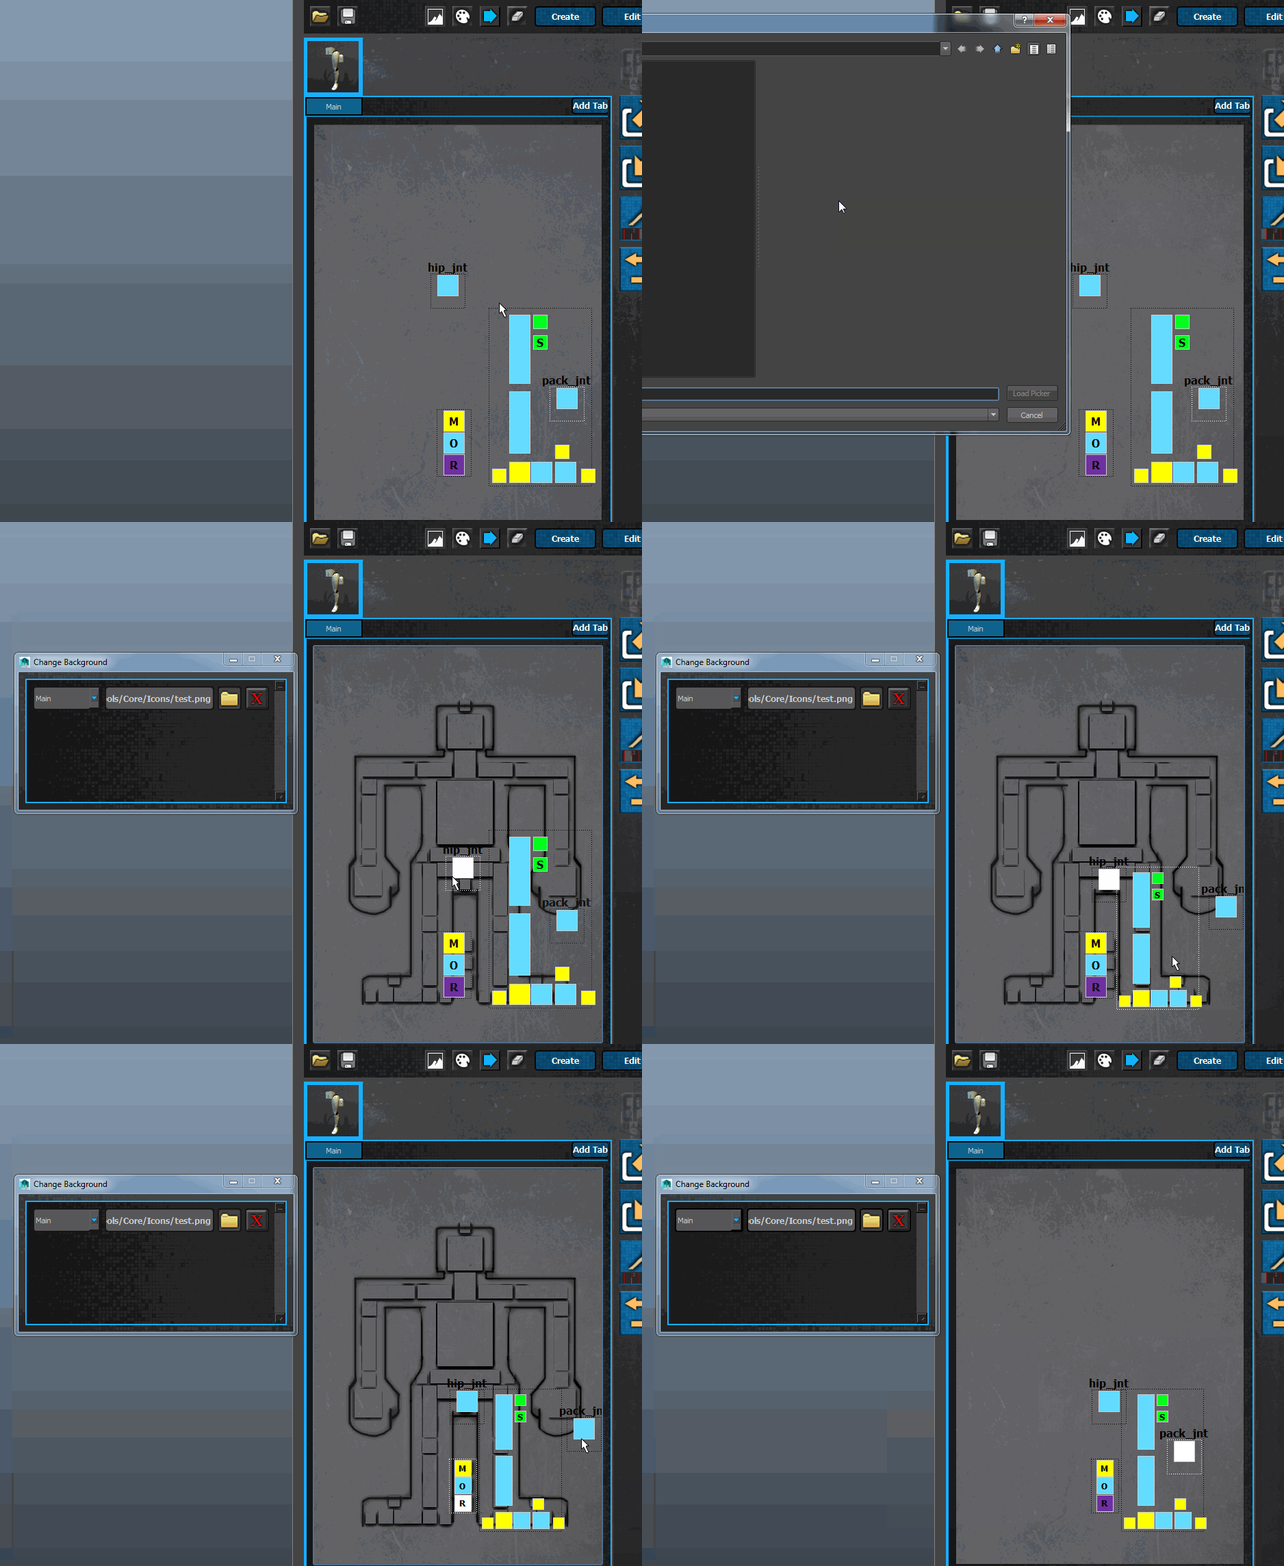
This was something else I added in. I really wanted the ability to set a custom background in the picker, in each picker tab. 

These backgrounds also save and load with the templates!


It's been a pretty productive couple weeks! There was also some bug fixes and polish items done. Next week I'll start the arm module, which I'm guessing will take a couple weeks, then I have the spine, head, and chain modules. So not too much left to get to parity! 

Animation Picker Complete, Import/Export Motion Complete! by Jeremy Ernst

Things are really starting to pick up! Progress is moving along nicely now.

The Animation Picker has been completed. Bugs have been fixed and functionality is all in place! At this point, the only thing that needs to be done is build each module's "picker" so that it can then be added to the canvas.


The next thing that was worked on was being able to export FBX motion out. The major improvements here, over V1, is that the speed of the export is insanely quick now. I made a lot of optimizations to improve the speed. The other thing added was the ability to also export the mesh from this tool. All settings made per character are also saved and remembered, so everytime the tool is reopened, the interface populates with those settings.

Lastly, I just wrapped up import motion today! This imports and FBX onto the rig (for things like mocap). Each module has its own settings on how it will import the data onto its controls. This means that only the controls needed for the given import method will get data. For the leg, I can choose None, FK, IK, or both. If I choose FK, only the FK controls will get data/keys. For the root, I can choose to import No motion, or I can import the root motion onto either the offset, master, or root control. The benefit of being able to choose None for each module, means that you can specify which modules will get motion, so you can combine mocap for upper/lower body, or whatever you'd want to do there.

Next up, I'll work on the matching tool, then onto the Single Joint module :)

Animation Picker WIP #1 by Jeremy Ernst

Loads done on the framework side of getting the animation picker up and running.

Each module has a picker that can be added to the canvas. That module's picker can then be moved, scaled, and rotated.

Saving and Loading templates is also working.

Next up: Ability to add more picker tabs (say a tab for fingers, face, etc), then biped leg picker

July Update! by Jeremy Ernst

It's been a long time since I did an update. Lots of stuff going on at Epic these days, and the days are packed with things to do, but tons of progress has been made on the tools amidst all that!

this is what I look like working..

this is what I look like working..

Since the last update, here are some of the things that have been done:

  1. Leg rigging completed

  2. Root rigging completed

  3. Global rig scale implemented (new V2 feature!)

  4. Rigging interfaces and code all wrapped up and polished

  5. Add and Edit Character UIs and functions done

  6. Animation picker R&D

  7. Began work on animation picker

For the rigging, most of the animator-facing features are the same, but under the hood, everything has been re-written and many small features added. As mentioned, there is now global rig scaling, which should be a pretty handy. Also, minor changes like: squash and stretch now correctly blend as do fk/ik switching.


For all of the rigging interfaces, I ripped out all of the custom images and styling I had been doing in code, and instead wrote a nice style sheet that each UI uses to cut down on the amount of code being written and also to give a nice consistent look to everything, as well as getting some additional polish features like button animation and such.

Add and Edit character use the same interface code, but the add/edit buttons get swapped out depending on which menu option you chose:


Also of note, is that there are no longer two files for every character. There is now only one file. If you want to edit a character, and you bring up the rigging tools, you will have to remove rigging to go back and edit placement and such.


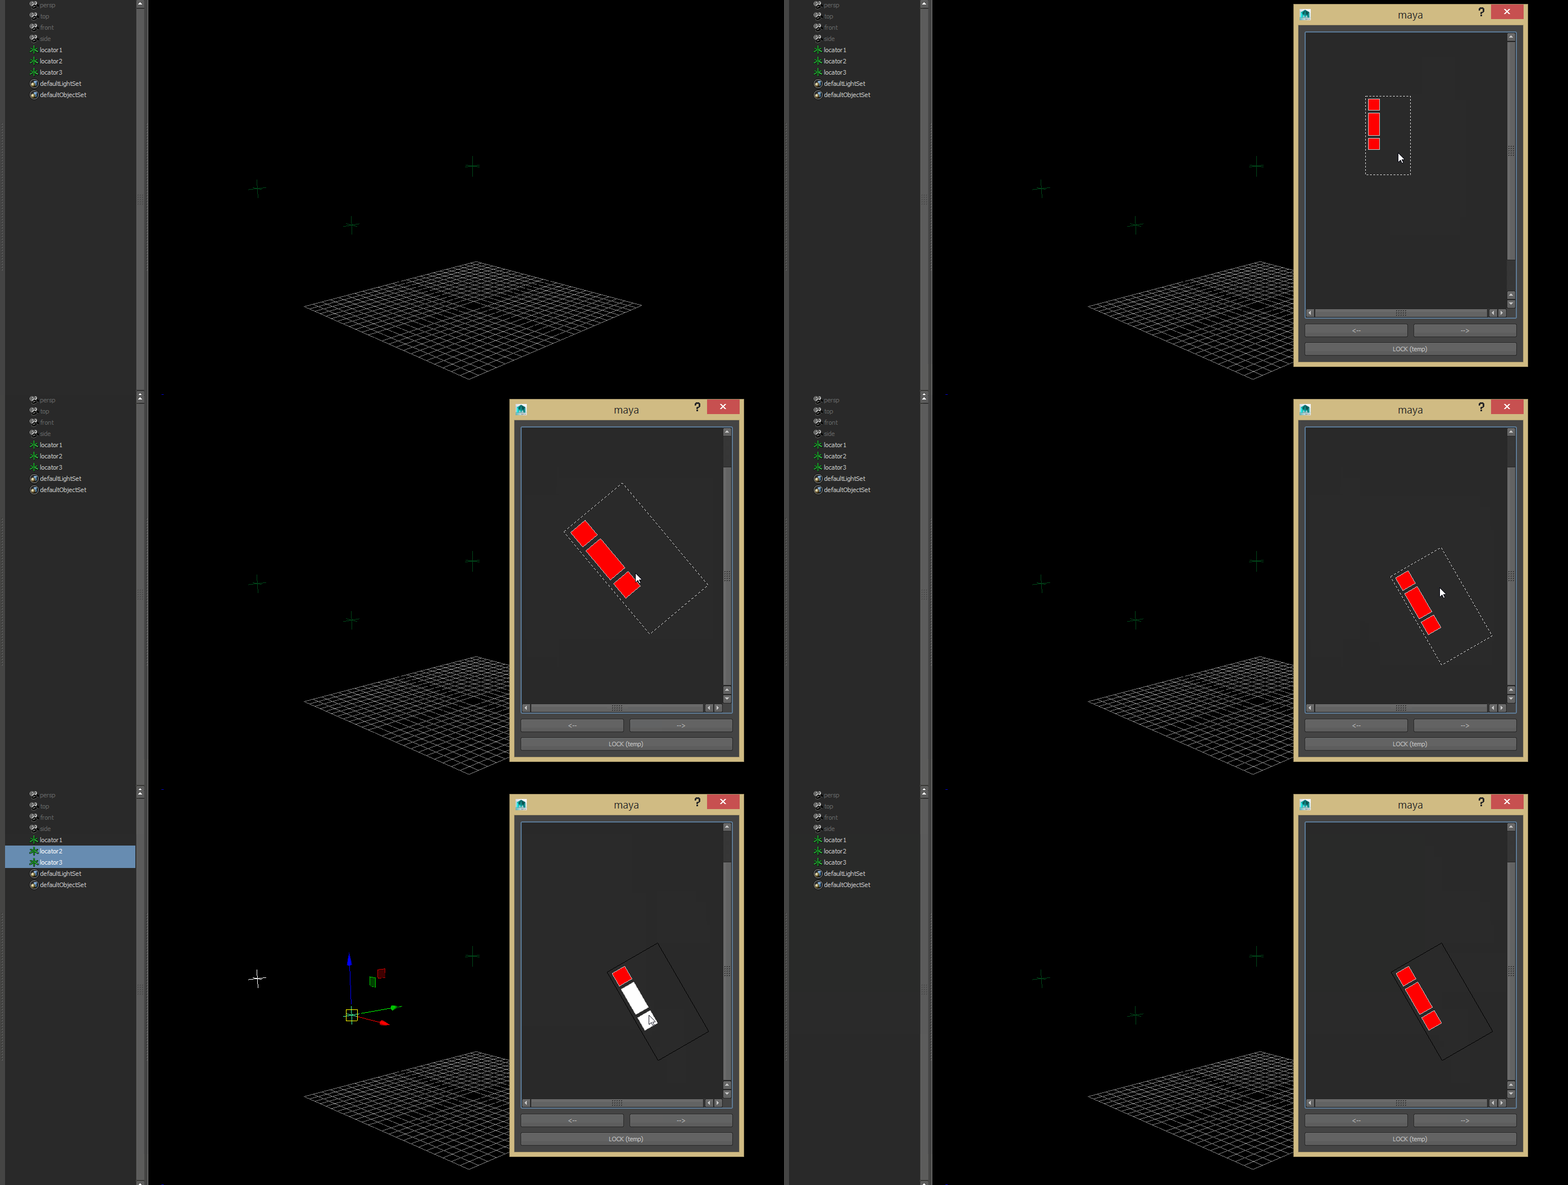
The animation picker has been something I've been fearing a little bit, as it was the main thing I had in my head that I didn't really know how to pull off. I did some research and some tests and actually got what I thought would be the hardest part working in a day. This test shows what would eventually be a picker for a module, being able to be moved around on a canvas, rotated, and scaled. Each module will have a pre-written picker for it, that can be added to a canvas, and manipulated like this.


This will then get saved out to a picker file that will be associated with the given character. Even for the standard biped picker, this would allow people to go in and edit that file to better customize the layout for them. The rest of the picker isn't far enough along to bother showing until I get more done, but that will be the next big thing coming up.

Cheers!


A.R.T. update #5 by Jeremy Ernst

Whoops! It's been a while since I've posted an update. Lost track of time I suppose. I've been spending the majority of my time working on our game projects, which has been tons of fun! I sneaked in a few days of work on the tools though, so here's where things currently are!

  • I cleaned up the UI a little bit, removing the bone counter from being embedded to being a separate widget you can bring up:

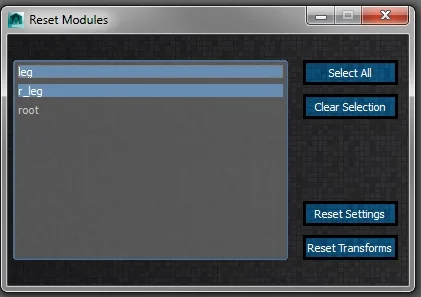
  • I got the reset modules tool in and done! This tools lists all of the modules in the scene and allows you to multi select them, and either reset their settings or reset their transformations (with translate, rotate, and scale broken out)

  • Added the above tools to the toolbar (reset being the 0, and bone counter being the 2 icon):

  • I began work on the next phase of the pipeline, previously called deformation setup. It's now been changed to Finalize Setup, which I think is clearer.

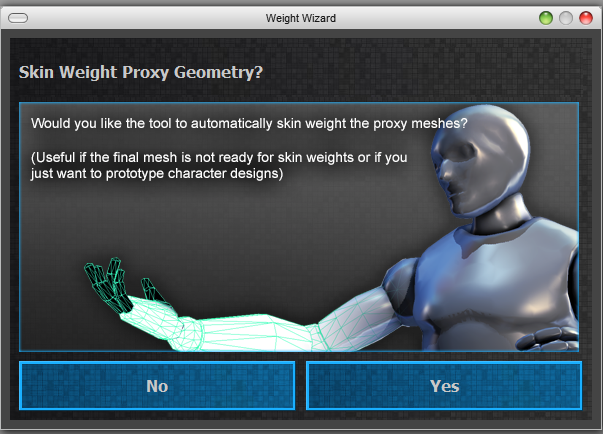
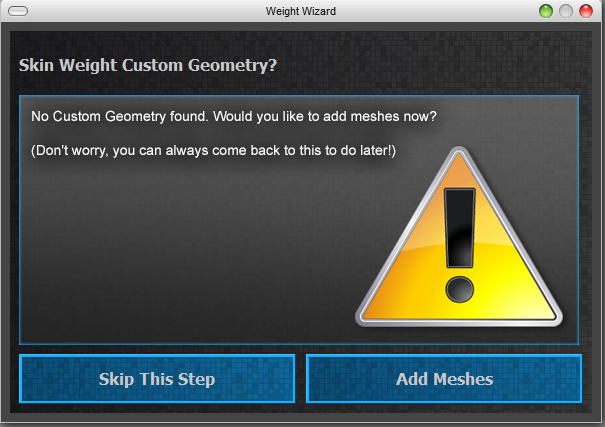
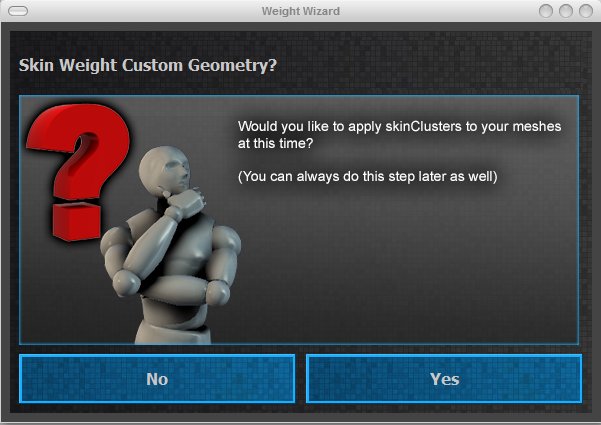
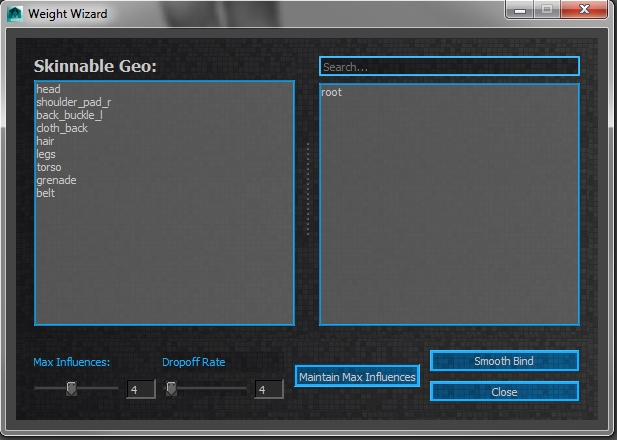
  • Wrote a "Weight Wizard", that guides users through getting deformations setup on their characters. There was always some confusion over when and where in the process to add your custom meshes, so hopefully this will clear that up!
  • The last image shows a new tool that allows you to quickly get skinning information on your meshes quickly. It's still in progress, but all of the main functionality is there.

Lastly, here is a video showing and covering all of the above features in greater detail. Enjoy!


Mini Update: Mass Mirror Mode by Jeremy Ernst

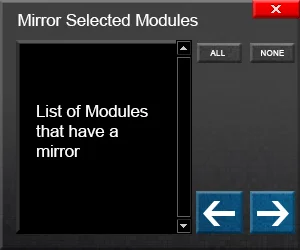
I was able to get some time in the past couple of nights to get this feature in. This feature replaces symmetry mode in the current version of the toolkit. However, I wanted something a little bit easier to work with since this is a modular system, so I came up with a new tool for it.

First, I planned out what the interface might look like in photoshop:

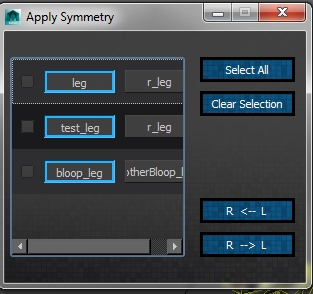
This is just meant to give a quick direction to start working towards. Here was my initial replication of that design in Qt:

This image doesn't show all of the iteration up to this point. The first thing I had to figure out that I didn't put any thought into during the initial brainstorming was how to list the modules. This tool is supposed to show you the modules that can mirror and let you decided how to mirror them. At first, I had a list of all of the modules, but that doesn't allow you to choose how and what to mirror. So the image above represents the next step, which was making a list of pairs: the module and the mirror module, and allowing you to select the one that the tool would use the transformations of. However, there are a few issues here. The Left to Right and Right to Left buttons are no longer needed since you specify the mirroring behavior in the list. Also, the list needs to be wider to accommodate longer names.

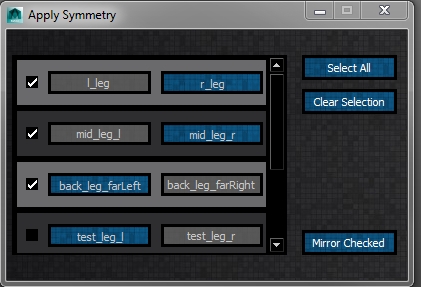
Here is a look at the final version(though I'm not quite sold on the color scheme yet. That might change):

Here's a quick video showing the tool in action:


Mini Update: Bone Counter by Jeremy Ernst

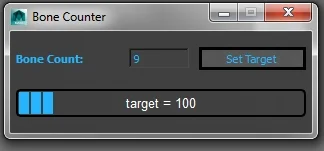
One of the guys at work had a suggestion to add a readout to the UI that would tell you what your bone count would be. I took a couple hours tonight and got that implemented and added a fancy progress bar, because why not.

It's pretty low profile and gives you your current bone count given your module settings, and a progress bar showing how close you are to hitting your target bone count, which can be set with this UI:


The bar will turn red if you go past your target, just letting you know you've exceeded your entered value. It doesn't actually do anything, just presents that information in case it were useful!

A.R.T. update #4 by Jeremy Ernst

Super productive week! I love when that happens. Thank you PAX for making it so I had very few meetings :)

I'm really happy with what got done this week. The majority of the toolbar is complete. The context menu options are complete, as well with the associated functions. 

Context Menu Options

Context Menu Options

Check out the video to see this week's progress!


I noticed a small bug while recording this too. The thigh and calf twist joint proxy geo isn't being affected by the visibility toggle. Whoops! I'll get that fixed for next time. 

JSON vs. cPickle by Jeremy Ernst

Hey all!

Just a quick mini tutorial/blurb about using JSON. In the first version of the Animation and Rigging Toolkit, I used cPickle, because I didn't know any better :) If you're unfamiliar with cPickle and JSON, they are both Python modules (in this case) that allow you to write out Python data, like lists or dictionaries, and have them be read back in as that data type, instead of the usual string you'd get back from file.readlines().

There are a few reasons to switch to json over cPickle. First, as I learned with the tools, cPickle and source control do not mix well. cPickle seems to be very dependent on its new line/line ending characters staying intact, and Perforce would corrupt this by changing the line endings in the file, unless you set your line endings setting in P4 to use something like 'unix' instead of 'universal line endings'. This is somewhat okay in a studio setting, it's an easy enough thing to control, but when tools are mass distributed, this can become a nightmare. The other downer of cPickle is that the file is not human readable. Depending on what you're trying to save out, this might be acceptable. I found for saving out poses or templates or animation data though, that being able to open, read, and edit the data inside the file would have been mighty useful!

So, onto JSON! The functions for both are very similar, and they do very similar things, but JSON seems to be more forgiving with not getting corrupted when using source control, and it's human readable, so at the very least, one could edit the file to fix any possible issues.

To use json to write out a list of data, first I created the list I wanted to save out, then:

I use maya's fileDialog2 command to grab the name of the file the user wants to save, create that file (or open if it exists), and then use json.dump(data, f) to dump my list (data) into my file (f). If you're wondering what "*.template" is, with text files you can save with any arbitrary file extension you want. In this case, since I was saving out data for a rig template, I made a template file extension.

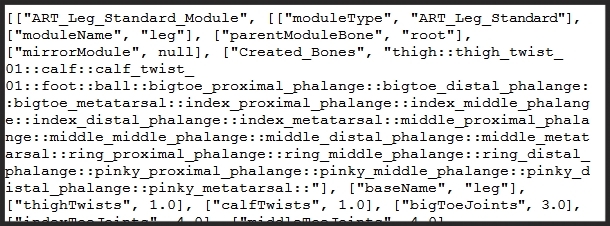
Here's a snippet of what that file looks like if I open it in wordpad:

To load this data back in as a list that python understands, you can simply use the following:

Super short and sweet. Again, using Maya's fileDialog2 command to get the file to open from the user, then opening the file, using json.load() on that file (storing into the variable data), and then closing the file! Now you can iterate over the list, data, to get whatever it was you needed(in this case, template information).

If you've looked at the json documentation, you'll notice there are two load functions: load() and loads(). The load() function is what you want to use if you are passing in an actual file, whereas the loads() function is what you'd use to pass in a string/unicode. All of the examples I had seen online before looking that up were using loads(), but they weren't actually passing in a file object, so when I tried using it, it would error out! 

That's pretty much it! I hope someone finds this useful, as it's now my go to module for saving out data!

A.R.T update #3 by Jeremy Ernst

It's been a pretty productive couple of weeks! Had more time to work on tools than usual and got most of the leg module/base class functionality wrapped up!

Check it out!


Here's some screenshots of the UI, since the video compressed them to pure ugliness. (click to enlarge)


A.R.T update #2 by Jeremy Ernst

Hello again!

This week's update is a little weaksauce since I've been busy working on some of our games instead of the tools the past couple weeks. I've hired two more senior level technical animators to help out with the work load we have here, so that will free up tons of time to work on tools! 

So new stuff this time around is I've got some of the toolbar buttons working now, and I've got a bunch of new UI functionality as well as the leg joint mover going. I explain it in the video, but the reason you're still only seeing a leg is that I'm working on all of the base functionality that all of the modules will use, and the leg is my test module for all of that. Once all of that base functionality is done though, getting the rest of the modules hooked up will be really quick!

Here's this update's video. It goes over a lot of how the code is setup and talks about the base class functionality pretty in-depth, so if talk of code bores you, look away now :)


A.R.T. Update #1 by Jeremy Ernst

After speaking with some folks on the official forums (https://forums.unrealengine.com/showthread.php?2447-Animation-and-Rigging-Tools-FAQ-Known-Issues-and-Feature-Roadmap/), it seemed like a blog would be a good idea to show upcoming features and things currently being worked on!

This week was pretty productive in that regard, but I'll get to that in a minute. The ART tools are something I'm both proud of, but I can also see all of the massive problems and issues, and it is my desire and passion to bring something really solid that meets Epic's needs and our subscribers' needs as well. There were a few issues at launch back in late March that were things I never even thought to check or test for! Cross-platform capability being one of those. You see, these tools were initially developed solely for our studio's games and projects and as such, were developed and tested on the version of Maya we use on the OS we use. So, that's one of the first things I want to get fixed and as soon as possible.

The other thing I always wanted to do and had planned, but due to time constraints had to forego, was making the whole system modular and not just a bipedal rig. With a tool this complex though, it's really hard to address one issue at a time when they are infrastructure issues like these. So, I'm currently rewriting a bunch of the core infrastructure to address cross-platform capabilities and convert the whole thing to a modular rigging system, capable of rigging: props, vehicles, bipeds, quadrupeds and everything else.

Here is where I am on this by the end of this week. Hopefully much more to come soon!

Animation and Rigging Toolkit by Jeremy Ernst

These are the tools I have been writing for the last two years, and they are now available to Unreal Engine 4 subscribers! (www.unrealengine.com). Check them out!

The video below goes over a narrated version of the tools:

Check out an overview of the Animation and Rigging Toolkit! This is the toolset Epic Games' lead technical animator Jeremy Ernst created for our own internal projects, and now Unreal Engine licensees and subscribers can have it too!

Gears of War 3 Work by Jeremy Ernst

Gears of War 3 Rigging Reel

A small sample of the rigging and tools work completed for Gears of War 3!

ears of War 3 Facial Rigging GDC 2011 Talk

This is my GDC 2011 talk about the facial rig setups in Gears of War 3.


Gears of War 3 Pipeline GDC 2012 Talk

​My GDC 2012 talk covering the entirety of the rigging and animation pipeline for Gears of War 3 and how the pipeline evolved by learning from past lessons.